Phone Case Tutorial
Phone Case Tutorial
How do you spend your time in long car rides? This spring break, my family was able to travel with my parents to Georgia and spend some time relaxing in warmer weather (sorry Ohio!) It was remarkable how many Ohio license plates we saw, and two from our same county at the place we were staying.
Our kids traveled so well this trip now that they are all out of the baby stages and can entertain themselves (mostly). Give them videos and snacks, and they’re ready for the 2 day drive!
During this car drive, I came across a video of someone embroidering a phone case insert. Even though I don’t embroider, I knew I could find a way to use some fabric scraps and make a customizable cell phone case.
Well, it turned out adorable! A few simple supplies, 20 minutes, and there you go! I thought I’d share my directions for anyone interested.
*Make sure to take off cover while charging.
Supplies
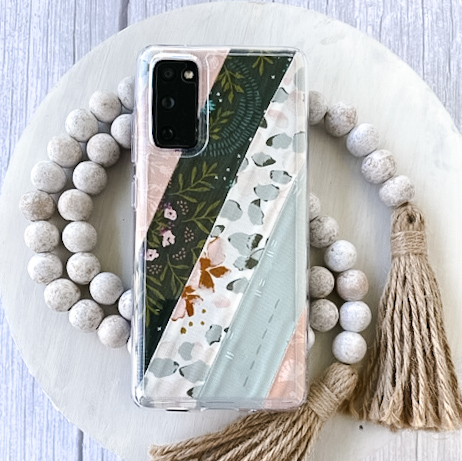
- Clear cell phone case for your cell phone brand. My phone is a Galaxy S20 FE. This is the phone case I bought.
- Small sharp fabric scissors
- Sewing machine
- 1 ½” fabric scraps
- Lightweight interfacing
- iron
How-To
With the smooth side of the interfacing facing up, tracing the phone case and the lens hole onto the interfacing.

Lay out your fabric scraps over the interfacing template to see what arrangement of the fabric you like. Piece scraps together. I chose to sew strips in straight pieces and then lay it out diagonally across the interfacing. For me, I started with the middle fabric strip and sewed strips together on either side of the middle strip.

Press the seams open and make your piece very flat.

Lay your fabric wrong side up. Place the interfacing bumpy side down on top of the fabric. Make sure to position the template where you want it to go. Before attaching the interfacing, lay your actual phone case on top of the template and fabric to make sure you have the lens hole lined up.
Press and attach the interfacing to the fabric following the manufacturer’s directions.
Using sharp small scissors, cut out the phone case template/fabric. I tried using this Fiskar’s Precision Knife, but still ended up using my fabric scissors. I would recommend using small sharp scissors over this tool, but you might want to try it if you already own one.

Set your cut fabric piece into the clear phone case. See which areas might need trimmed. For me, I needed to trim a bit from the bottom and sides to cut the fabric away from buttons and charging port. I also trimmed a little more around the lens hole. Be careful when trimming. Make sure you trim enough fabric away from the charging port to avoid any potential hazards when charging the phone. You want the fabric to reach the bottom of the case but not around the bottom of the case by the charging port.
Place your fabric into the phone case along with your phone.
My son asked me to make him a phone case when he gets his own cell phone (many MANY years from now), but of course I will! This is such a fun, quick and rewarding project! I hope you enjoy!
**One word of caution: be mindful when charging. Remove cover from phone when charging, or make sure the fabric is trimmed away enough from the charging port to avoid any hazards.