Hand Quilt - Big Stitch

Hand quilting intimidated me. It also included things I didn't have: a large hoop, embroidery skills, LOTS of time to sit and stitch, and I'm left-handed-so finding someone to teach me seemed improbable.
Then, I saw a picture of big stitch binding shaped like a snowflake. I just HAD to learn how to do that. I had just finished a wintery quilt, and that detail on the binding would be perfect. I started digging into tutorials and directions. I finally figured out how to start, and I spent my winter months perfecting my big stitch hand quilting.
I'm here to show you what I learned so you don't have to go searching.

Materials
Size 8 perle cotton thread, your color of choice.
Embroidery needle (they have slightly bigger eye but very sharp point)
Small pair of scissors to cut thread
Let's get started!
First, tie a quilter's knot. I thread my needle, and then I take the free end of the thread with my opposite hand. I wind the thread around the needle, wrapping it away from me two times.

Then I pinch the wrapped thread and pull it down the needle and ALL the way down the thread. Voila! Then trim the tail of the knot.
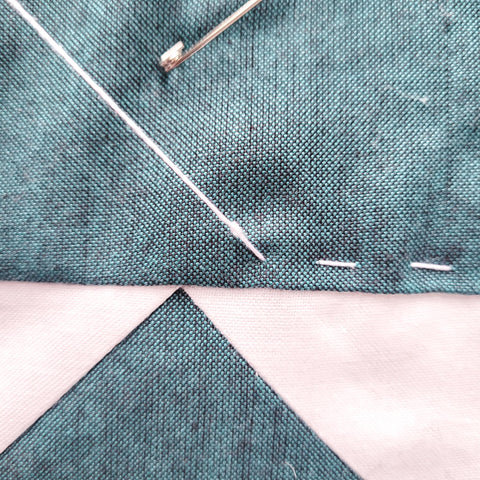
Insert your needle 1/2in-1in away from where you want to start on the TOP of your quilt. Only go through the top layer of the quilt at this point.

Bring your needle back up where you want to start your sewing. Pull the needle through, hold onto your fabric tight, and tug the thread until the knot pops under the top layer of the quilt. I have broken the thread before, but never have I ripped my quilt top. Scary, yes, but it'll be ok!


Trim the tail of the thread so it's not noticeable. Then rock your needle through the layers of the quilt 2 or 3 times before pulling your needle all the way through. Try and make the spaces even on your needle to keep the stitch length even. Pull needle through quilt.


When you get to a corner, try and end your stitching so your needle is coming up through the top. It makes turning the corner easier. If not, no big deal.

When you have 4-5 inches of thread left, or you are done with a section, you will need to tie off the thread. First, wrap the thread around the needle twice going away from you.


Then pinch the thread and pull it down your needle and all the way down the length of the thread. This will make a quilter's knot again (like at the beginning).
Insert your needle into the hole from which your thread is coming up out of the quilt. Send your needle under the TOP layer of the quilt only. Travel about 1/2in to 1in away from where you stitch. Then hold tight onto the fabric and tug the knot through the quilt top. Trim the end of your thread closely to the quilt top.


Be VERY careful to not snip your quilt!! If the thread breaks, that's fine. You will have to take out a few stitches and retry. But snipping your quilt top is much more difficult (and heart-breaking!) to fix.
And that's it! Just repeat over and over in new sections or when thread runs out.
It's snowing today in Ohio, so it's the perfect time to relax with the kids and hand quilt my Redemption Trail Quilt. Share your hand quilting beauties with me on Instagram @fieldstone.fabric.